Easy DIY Dinosaur Sensory Bin Activity Idea For Kids
Our Easy DIY Dinosaur Sensory Bin will transport your child’s imagination back to the prehistoric land of the dinosaurs! Sensory bins are an excellent way to stimulate various senses, promote sensory exploration, and encourage imaginative play.

My kids LOVE sensory bins, and I love creating them! In the past, we’ve tried sensory bins with colored rice as the main sensory experience. And we’ve also made other sensory bin ideas, including an ocean-themed sensory bin with water beads (so fun!) and a sea life sensory bottle.
This time, I made a sensory bin with sand – and since I have boys, it was time for a dinosaur adventure. Our sensory bin HAD to be a dinosaur sensory bin!
Believe it or not, sensory bins are SUPER easy to put together. Kids love playing with them, and I love that one sensory bin with sand and toy dinosaurs produces hours of imaginative play. WIN!
This interactive DIY bin is a great way for little paleontologists to explore the world of dinosaurs through sensory play, encouraging creativity, fine motor skills, and cognitive development.
Whether you’re a parent or educator, this simple yet exciting activity is perfect for engaging young minds in hands-on learning while they embark on a prehistoric adventure. So gather your supplies and get ready to create an immersive sensory experience that will transport your little ones back in time to the age of dinosaurs!
Love crafts and easy DIY projects? Grab this mini activity book for more by clicking the image below – free! 👇

This hands-on project is perfect for young dinosaur enthusiasts, providing them with an exciting way to learn about these prehistoric creatures.
If you want more engaging sensory ideas and recipes, try my Easy Cloud Dough Recipe or DIY Rainbow Spaghetti.

Benefits of Sensory Play
Sensory play offers numerous benefits for children’s development and overall well-being. Here are five key advantages to having young kids engage in sensory play:
- Cognitive Development: Sensory play engages a child’s senses, encouraging them to explore, investigate, and think critically. It promotes problem-solving skills as they figure out how materials behave, interact, and change. This type of play also enhances memory, language development, and math skills as children compare, contrast, and categorize sensory experiences.
- Sensory Integration: Sensory play helps children integrate information from their senses, such as touch, smell, taste, sight, and hearing. This is essential for understanding and responding to the world around them. When kids engage in sensory activities, they learn how to process and make sense of sensory input, which can be especially beneficial for children with sensory processing disorders.
- Fine and Gross Motor Skills: Many sensory activities involve manipulating objects, pouring, scooping, and using various tools and materials. These actions enhance both fine motor skills (precise hand and finger movements) and gross motor skills (large muscle movements). For example, playing with sand or dough can help develop hand strength and coordination.
- Emotional Regulation: Sensory play can have a calming and soothing effect on children, helping them manage stress, anxiety, and emotional regulation. It provides a safe and enjoyable outlet for self-expression and can serve as a coping mechanism for dealing with challenging emotions. Activities like squishing playdough or playing with water can be particularly calming.
- Social and Language Skills: Sensory play often involves interaction with others, whether it’s sharing materials, taking turns, or describing sensory experiences. This type of play encourages communication and collaboration, helping children develop social skills, empathy, and the ability to express their thoughts and feelings. Additionally, it can be an inclusive activity that allows children of different ages and abilities to play together.
Incorporating sensory play into a child’s daily routine can be highly beneficial for their overall development, fostering creativity, curiosity, and a deeper understanding of the world around them.
Supplies Needed For DIY Dinosaur Sensory Bin
Here are the fun sensory materials you’ll need to make this sensory kit for your little dinosaur lover!
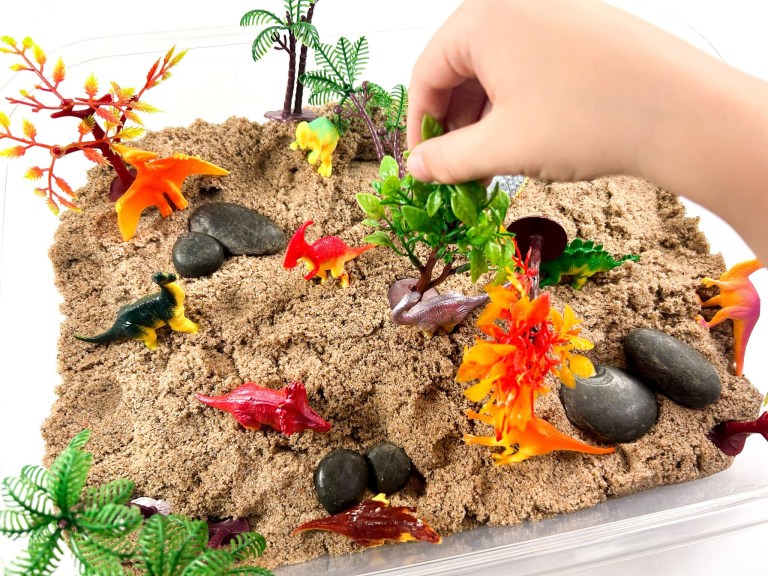
- Sensory Bin – plastic container with lid
- Kinetic Sand – any color of sensory sand you prefer
- Dinosaur Toys – any dinosaur figurines or plastic dinosaurs work!
- Faux Plants – or any sort of plastic trees or artificial plants
- Small rocks or stones
- Salt Dough Dinosaur Fossils – optional but fun!

How to Make A DIY Dinosaur Sensory Bin
It’s time to go on a dinosaur dig and find dinosaur eggs, dino skeletons, and dinosaur fossils! Here’s how to bring all the elements of the sensory kit together into an amazing sensory box that encourages sensory development.
Step 1
Begin by adding the kinetic sand into the sensory bin.

Step 2
Now place the trees and stones in the bin in various places.

Step 3
Place the dinosaurs in the sensory bin on top of the moldable sand.

Step 4
Time for the kiddos to check out this great sensory activity and explore with hands-on play!!

DIY Dinosaur Sensory Bin Recipe Notes And Tips
- Place a large towel or bed sheet under the sensory bin, which will help with easy and quick cleanup for any contents that have been spilled outside the bin. If possible, take the sensory bin outside.
- Depending on the age of the child, adult supervision at all times may be necessary. Younger children will have a tendency to want to put things in their mouths.
- Remember…..less is more. If you put too much stuff in the sensory bin, it will become overwhelming to them.
- Include a few sensory tools to help young children explore the sensory play idea. Some examples could include paint brushes, plastic cups, magnifying glass, a sand sifter, wooden scoop, or even a fossil brush!

Variations Of Dinosaur Sensory Bin To Try
- Include some tools such as spoons, scoops, funnels, tweezers, or shovels.
- Change the theme based on your child’s preference. Some of our favorite themes include beach, birds or animals, airplanes, or space.
- Try using different sensory bin fillers – sand, water beads, colored rice, tiny pebbles (if your child won’t swallow them).
- Some easy and inexpensive ideas for the contents of your sensory bin might include:
- sand
- cotton balls
- shredded paper
- craft feathers
- dry pasta or rice
- beans
- unpopped popcorn
- Easter grass
- crinkle grass
- pipe cleaners
- foam volcano
- white plastic eggs
FAQs
Do you have questions about our DIY Dinosaur Sensory Bin? If you have a question and don’t see it already answered below, please leave it for me in the comments!
I’m glad you asked. 😉 A sensory bin is generally a large plastic container or storage tub that is filled with materials and/or objects that help to stimulate your child’s senses.
Children learn best with their hands, eyes, ears, and noses. If they can smell, touch, see, and hear something it helps them to retain information more effectively.
A sensory bin is typically filled with a variety of common objects such as beads, dry pasta, small toys, and tools to stimulate their senses.
I would suggest a plastic tub or large container. The size of the sensory bin is going to be subjective for each person, depending on the number of children that could be playing at the same time. I prefer to have a tub or container with a lid so when they are finished playing, all that has to be done is to snap the lid on tight.
That is a great question! There are a couple of factors I consider when thinking about changing the contents of our sensory bins.
First and foremost is the cleanliness and how much my kids have played with it. This will be something you need to determine.
Second, you want to keep your kids engaged so it might be a good idea to change it out once a week or every couple of weeks to keep them excited and occupied.
Sensory bins provide the opportunity to develop both fine and gross motor skills. Pouring, dumping and scooping are helpful in learning transferring skills.
They will also help support cognitive development as children learn to sort items by size and color.
Love crafts and easy DIY projects? Grab this mini activity book for more by clicking the image below – free! 👇
More DIY Kids Activities To Try
- Dancing Raisins Experiment
- Easy Earth Day Science Experiment (STEM Activity)
- How To Melt Crayons Into New Shapes
- Fireworks In A Jar Experiment
- How To Make Fluffy Slime With Only 4 Ingredients


Easy DIY Dinosaur Sensory Bin
This DIY Dinosaur Sensory Bin will transport your child's imagination back to the land of the dinosaurs by using the various senses!
Ingredients
- Sensory Bin
- Kinetic Sand
- Dinosaur Toys
- Faux Trees
- Stones
Instructions
- Add the kinetic sand to the bin.
- Place the trees and stones around the bin.
- Add the dinosaurs.
- Invite the child to engage with the contents of the bin and observe what he/she does with the items!


